How to style markdown using tailwind V4
Styling markdown generated content using tailwind classes, complete with an example.
The Problem
Markdown generators translate the file directly into HTML components without any classes assigned by default. This is a problem with Tailwind as classes are used to directly style each element.
One solution is to assign classes to each element by custom code, but this adds lots of unecessary complexity. You also must ensure Tailwind does not purge the classes.
There is a better way.
The Solution
The best solution is to use the power of CSS combined with Tailwind utility classes. This can be done with Tailwind’s @apply feature linked below. Every component can be styled by first wraping the content with div with a special class name, then by styling different elements within this class.
We will go over styling every markdown element that can be generated. There will be a complete cheat-sheet at the bottom!
1. Setup
First get your Markdown generator working, and wrap it between the class element.
<section class="markdown-blog">
<!-- Generate markdown here! -->
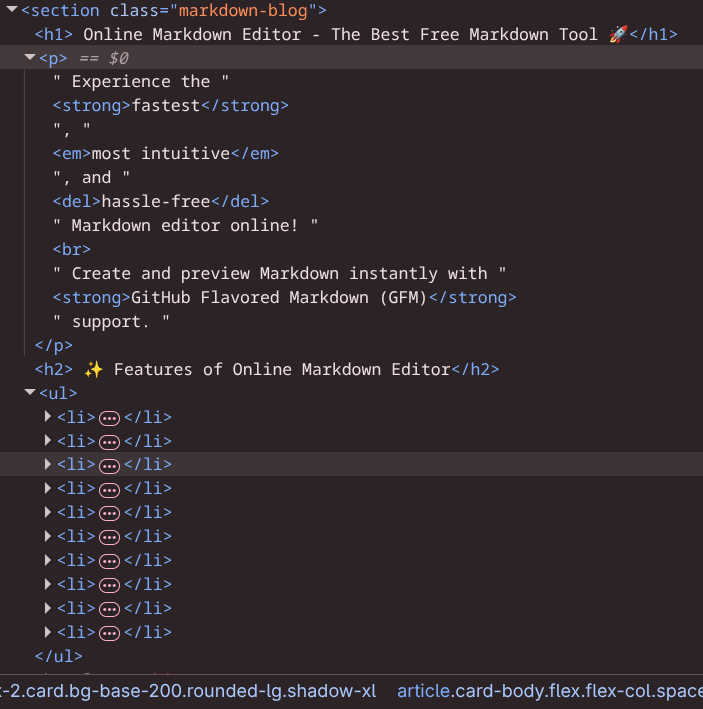
</section>Make sure the ‘markdown-blog’ element is exactly ONE element between the markdown HTML. Do this by going into inspect element. Your content should look like this:
Markdown file used above: Markdown Sample Used
2. Test Styles
Let’s start by styling paragraph and a header. Open your Tailwind config file and add the first two styles. Copy the following code and paste it at the bottom of your app.css.
.markdown-blog {
  @apply text-base;
}

.markdown-blog p {
  @apply text-lg my-2 text-blue-500;
}

.markdown-blog h1 {
  @apply font-bold text-4xl mt-6 mb-2 text-red-600;
}
At this point each paragraph should be blue, and each h1 header will be red. Make sure this works before styling every other element.
3. Style Headers
NOTE: I will be using daisyUI colors throughout the rest of this tutorial. Be sure to replace these with your own if youre not using this library!
Now its time to style for real! Delete the test styles and replace it with the following code:
/* Main container */
.markdown-blog {
  @apply text-base-content;
}

/* Headings */
.markdown-blog h1 {
  @apply text-4xl font-bold mt-6 mb-2 text-primary;
}

.markdown-blog h2 {
  @apply text-3xl font-bold mt-6 mb-2 text-primary;
}

.markdown-blog h3 {
  @apply text-2xl font-bold mt-5 mb-2 text-primary;
}

.markdown-blog h4 {
  @apply text-xl font-bold mt-4 mb-1 text-secondary;
}

.markdown-blog h5 {
  @apply text-lg font-bold mt-4 mb-1 text-secondary;
}

.markdown-blog h6 {
  @apply text-base font-bold mt-3 mb-1 text-secondary;
}

/* Text */
.markdown-blog p {
  @apply my-2;
}
We apply text color to base-content to each element, unless specified otherwise. Markdown has headers h1 thru h6, so this covers every option with different sizes.
4. Style text and horizontal
Now paste this underneath the headers:
/* Text */
.markdown-blog p {
  @apply my-2;
}

.markdown-blog strong {
  @apply font-bold;
}

.markdown-blog em {
  @apply italic;
}

.markdown-blog a {
  @apply text-primary underline;
}

/* Horizontal rule */
.markdown-blog hr {
  @apply my-6 border-base-300;
}
This covers the paragraph, italic, links, and bold text elements anywhere within the markdown.
Horizontal rule acts as a divider in markdown used to split content. As shown below v
5. Style list elements
Now its time to style the list elements. Paste the following code beneath the last styles:
/* Lists */
.markdown-blog ul,
.markdown-blog ol {
  @apply my-4 pl-6;
}

.markdown-blog ul {
  @apply list-disc;
}

.markdown-blog ol {
  @apply list-decimal;
}

.markdown-blog li {
  @apply my-2;
}
This gives any list group (ul or ol) plenty of space between its neighbors, and some space between each item.
6. Style blockquotes and images
“Blockquotes are a special text element often used to quote somebody. Lets make them look good as well as your images.”
-Brian Hammer
/* Blockquote */
.markdown-blog blockquote {
  @apply border-l-4 border-primary pl-4 italic my-4;
}

/* Images */
.markdown-blog img {
  @apply my-4 max-w-full;
}
Now each of your blockquotes are pushed to the left and have a cool border line. Each image will also be controlled by the size of your container, so you do not need to worry about your container blowing up.
7. Style tables
| Table | Time! |
|---|---|
| Now its time | To style |
| All of | Your tables |
| and make them | look good. |
| Copy the | code below. |
/* Tables */
.markdown-blog table {
  @apply w-full my-4;
}

.markdown-blog th {
  @apply bg-base-300 text-base-content font-bold p-3 text-left border border-base-300;
}

.markdown-blog td {
  @apply p-3 border border-base-300;
}

/* Zebra stripes */
.markdown-blog tr:nth-child(even) {
  @apply bg-base-200;
}
This gives you a full width table with a bold header and zebra-styled table entries.
8. Style code blocks
WARNING DO NOT SKIP!! Code blocks use <pre /> elements that can break your layout unless styled properly.
Finally it is time to style any code blocks. Paste the code below:
/* Code */
.markdown-blog code {
  @apply bg-base-200 px-1 rounded text-sm font-mono;
}

.markdown-blog pre {
  @apply bg-base-200 p-4 rounded overflow-x-auto my-4 whitespace-pre-wrap break-words;
}

.markdown-blog pre code {
  @apply bg-transparent p-0;
}
This styles both inline and block codeblocks, and overrides the inline values when code is rendered a block (pre code).
Classes whitespace-pre-wrap and break-words make it so codeblocks will not overflow past your boundaries.
You now know how to style every markdown element using Tailwind!
Learn More
This website is Open Sourced! So if you like the styles used feel free to steal it here: Source Code
Complete Template
/*
COLOR GUIDE (daisyUI variables used)

text-base-content  → Main text color
text-primary       → Main brand color (headings, accents)
text-secondary     → Secondary brand color (smaller headings)

link-primary       → Link color

bg-base-200        → Light background (code blocks, zebra stripes)
border-base-300    → Border color (tables, hr)

border-primary     → Accent border (blockquotes)

btn-primary        → Primary button color (daisyUI component)
alert              → Alert component colors (daisyUI component)

These colors automatically adapt to the current daisyUI theme.
*/

/* Main container */
.markdown-blog {
  @apply text-base-content;
}

/* Headings */
.markdown-blog h1 {
  @apply text-4xl font-bold mt-6 mb-2 text-primary;
}

.markdown-blog h2 {
  @apply text-3xl font-bold mt-6 mb-2 text-primary;
}

.markdown-blog h3 {
  @apply text-2xl font-bold mt-5 mb-2 text-primary;
}

.markdown-blog h4 {
  @apply text-xl font-bold mt-4 mb-1 text-secondary;
}

.markdown-blog h5 {
  @apply text-lg font-bold mt-4 mb-1 text-secondary;
}

.markdown-blog h6 {
  @apply text-base font-bold mt-3 mb-1 text-secondary;
}

/* Text */
.markdown-blog p {
  @apply my-2;
}

.markdown-blog strong {
  @apply font-bold;
}

.markdown-blog em {
  @apply italic;
}

/* Links */
.markdown-blog a {
  @apply link link-primary;
}

/* Lists */
.markdown-blog ul {
  @apply list-disc pl-6 mb-4;
}

.markdown-blog ol {
  @apply list-decimal pl-6 mb-4;
}

.markdown-blog li {
  @apply mb-1;
}

/* Blockquote */
.markdown-blog blockquote {
  @apply border-l-4 border-primary pl-4 italic my-4;
}

/* Images */
.markdown-blog img {
  @apply my-4 max-w-full;
}

/* Tables */
.markdown-blog table {
  @apply w-full my-4;
}

.markdown-blog th,
.markdown-blog td {
  @apply border border-base-300 p-2 text-left;
}

/* Zebra stripes */
.markdown-blog tr:nth-child(even) {
  @apply bg-base-200;
}

/* Horizontal rule */
.markdown-blog hr {
  @apply my-6 border-base-300;
}


/* Code */
.markdown-blog code {
  @apply bg-base-200 px-1 rounded text-sm font-mono;
}

.markdown-blog pre {
  @apply bg-base-200 p-4 rounded overflow-x-auto my-4 whitespace-pre-wrap break-words;
}

.markdown-blog pre code {
  @apply bg-transparent p-0;
}